09 10 11 12
Blogging tips

Friday, August 2, 2013

Recent projects

I have been super busy with house hunting and getting ready for my big boy to come back home. So many of my friends are having babies and what not so I have been keeping crafty. I haven't  been taking good photos nor have I been blogging as intended so this is photo heavy.

Baby blanket for a little lady in our family, Kiernan tested and approved.

I finished 3 other faux quilts I only have this photo.


Martha Stewart embroidery kits also did this one.

Did some fun fused glass with the kiddo.

Head bands made from kits I bought at Jo-ann's forever ago.

More flowers from kits.

Baby onesie handmade cards...my own design.

House warming Basket for a family member.

Lamp Shade for Kiernan's room.

Pearler Bead bugs.

Ohio State string art... saw a million like this one pintrest and the web.
More pearler bead crafts.


Pearler bead bowl.

Used some leftover scraps to make Kiernan a pillow case to match the quilt his great Aunt made.

Polka Dot onesie... the purple is temp. ink.

Rope bracelet...found this on pintrest will link to as soon I find it.

Flower Wreath for spring/summer.


What have you been up to?

Tuesday, July 9, 2013

Pinned it, made it. Button tree?

A while ago I pinned this:
Well we recently had a new cousin born and they didn't know the baby's gender , but it was born and it is a GIRL! Which means I finally get to make some girly baby things... This was perfect.
I didn't have buttons so we used plastic gems and I put her name instead of the letter. (I blocked it in this photo.) I also bought a lazer cut frame and glued the flat canvas to the back after I painted it and covered it in glitter. To give it a bubbled look I used Mod Podge  Dimensional Magic. I love how it turned out!! I decided to add a few cute little butterflies and a ribbon to hang it from... What do you think? 

BTW if you have a link to the blogger that posted the original above please let me know!


Friday, May 24, 2013

Lala Loopsy wall art

A friend of mine saw the wall art I made for Kiernan's bedroom and asked if I could make some LALALOOPSY Themed art for her daughters room.

Her daughter is obsessed with the character Mittens. So I went to Jo-ann's and Micheal's and gathered some supplies..

Here's photos of where I thought I was finished...


But then I felt like there was an awful emptiness.... SO here is the final product!


I LOVE THEM!!!

Monday, May 13, 2013

Father's day cards... I know it's early...

So not long ago I found a link to Trendy Trehouse's blog and found the amazing card Tara made.
I knew these would be perfect for father's day for the many men in our lives, She made a great tute, but I changed a few things so I am going to do one for you also. BUT please make sure to check out her blog 1st as this wasn't my idea.


I knew right away that I wanted to make this a little more fancy. So I ran to Micheal's and got some card stock and scrapbook paper.

Then using Tara's tute I free handed my pieces onto the back side of each paper. I made a pdf template for you to use.. I added a bow tie (2 parts) and a pocket (two sizes).

I traced them on to my paper for this card. I used glue dots to make the ties and pockets stand up higher, used a glue stick for most everything else.

After tracing I cut out all the pieces and glued the collar outside to the back of the shirt piece. cut just below and bout one inch in. I marked it on my template.


Fold over and trim excess at top. Apply tiny glue dot to hold collar down, use another glue dot to put bow tie center on bow tie. 

Use thicker glue dot to hold bow tie down.

glue the two small triangles on side of the shirt and use thick glue dot to put pocket on.


Fold card stock in half and cut along line. open and glue on front and back.


Admire your handmade amazing cards, because you my dear are done! Comment if you want the pdf template... as I don't know how to attach it. :)


Card fronts


Card inside
  
card back


Sunday, May 12, 2013

Happy Mother's Day!

Hope all you moms and moms to-be had a great mother's Day. Mine wasn't too bad..lol mostly like a normal day. But in the end I don't really care, I have my boys and Doug and that's all I require.

I did great lots of flowers... I never get flowers and yet I got 3 vases full and one planted one from my 6 year old.

Now for Doug's mom I wanted to come up with something she could show off but wasn't clothing or jewerly. So I made a key chain with the boys photos. I am going to have to add some of the photos later as I forgot to take some but I plan to make another key chain hopefully tomorrow.

So here's what you will need :
2 photos printed smaller then wallet size
Elmers Glue dots
Bead landing found objects frame- Micheal's carries this
A key chain clip
chain
jump rings
charms if wanted
scissors 
pliers 2 pair


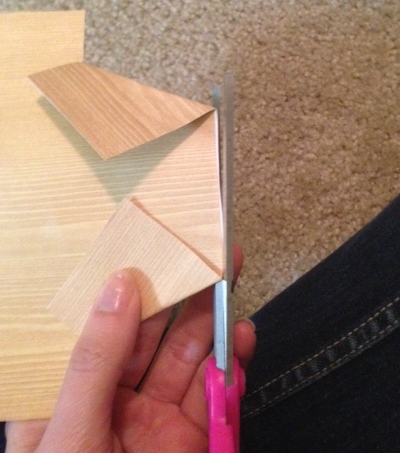
I printed two photos of my boys. After printing them figure out where I wanted the little bubble that come with the frames. They are sticky on the back.. after I put them in place I flipped my paper over and rubbed the back to make sure it was good and stuck.. then you just cut it out!


After cutting out these handsome faces, I used 5 glue dots to stick them to the frames. Since the is a key chain I wanted to make sure they didn't come off. Press the bubbles into the frames, I squeezed them as hard as possible to make sure the glue dots had good contact.


 Here is where I forgot to take photos but will tomorrow and will edit the post.
After that I used jump rings to make a chain and I attached one frame at the end... then I made another chain a few links shorter to add the 2nd frame and lastly I made a short chain to hang a tiny heart charm that said #1 Grandma. She got it today and loved it! It's easy, sweet and handmade.

Nothing in this post was sponsored nor was I paid, but I did win the glue dots on Elmers craft it facebook page... They do giveaways pretty often.. you should like them here!


Wednesday, May 8, 2013

You are my sunshine...


I found stickers at Micheal's craft store the other day... they were less then 2$ and I knew what I wanted to do with them the moment I saw them... Of course I forgot to take a picture of them before I used them. I also grabbed some Martha Stewart paints and a canvas.  I am working on redoing our 1 year old's room in more yellow and gray.

So this blog post at 2 Crafty 4 My Skirt. This made it so much easier... I did this but I didn't measure and ended up having to hand paint the bottom.
Before I added any stickers.


I knew I wanted to paint it gray with yellow chevron, I was trying to figure out how to tape it off when I found

Then I added my stickers... the you are my part was brown and the sunshine part was to orangey-yellow, So I grabbed my new paint markers that I just won from an Elmer's Craft it giveaway on facebook. No they didn't sponsor this post.. but you can like them on facebook here, they do giveaways pretty frequently.

So I used the yellow fine tip and colored over the orangey part then, I added a few or the curly doodads (yes that's really a word in my world.) But the yellow just blended in... So I grabbed my brown fine tip paint marker and filled them in...here's how it looked. I also framed the letters in Sunshine to make them pop.
Yellow fixed and some curly doodads.


I still felt like it wasn't enough... so I added more curly doodads. The one on the bottom right is actually two small curls placed closely together.. and then I filled those in. Then it was JUST right...


Practically Perfect in every way..


But I felt like I needed to do more art.. so I grabbed this


 and turned it into this.. Not a huge change but brighter and will work better with the plans I have for my son's room.

Saturday, April 20, 2013

Quick no sew ottoman recover..

I have never recovered any furniture before, but I figured these Ottomans would be an easy project.
Picture Borrowed from Signature Home styles Website.
The simple steps.
1. Buy Fabric... I chose one for the sides and something else for the tops.
This the the sides... Got it at Jo-anns

2. Remove any fabric you can't easily cover over... I only removed the top fabric
3. Staple, staple and staple some more...
One done and the top on the other completed.
 4. Admire your handy work....
Oh so lovely..but missing something...

5. Add some nail head trim.. I got mine at Lowes for less then $2 for 25.. Used 120 on 1 ottoman
Looking better!


Ah that's the ticket!